The different indentations are easier to perceive with a ruler. The indentations appear as various small triangles on the ruler.
Nice
### Displaying the ruler
Näytä-välilehden Näytä-ryhmän ylin valintaruutu on Viivain
Saat viivaimen näkyville näytä-välilehdeltä näytä-ryhmän napista viivain
Click the **Ruler ** option selected in the **Show ** group on the **View ** tab. A ruler will appear at the top of the page area.
Structure of the ruler
The grey areas on the sides of the text are margins, where writing is not possible. If necessary, the widths of the margins should be set in the Layout Page Setup Margins
In the white area, there are three triangles: two on the left and one on the right, showing how the text is indented.
The upper triangle on the left shows where the first line of each paragraph starts.
The lower triangle shows where the remaining rows start.
The triangle on the right shows where the lines end.
Example with first line indented
In the example, the upper triangle has been moved slightly to the right, so that the first line of text (but not the other lines) starts at the point indicated by the triangle.
Example where indentation is hanging
In the example, the lower triangle has been moved slightly to the right, so that all lines of text except the first line start at the point indicated by the triangle.
This type of indentation is commonly called a hanging indentation.
Setting indentations
In principle, you can adjust the indentation by dragging the triangle (the small rectangle under the left triangles is also for dragging), but the most sensible way to set the indentation is via the Paragraph
We'll look at this below.
Unnecessary trivia: Vertical ruler
The ruler is actually made up of a horizontal and a vertical ruler. The vertical ruler appears on the left side of the window and is almost superfluous. In practice, the term "ruler" refers only to the horizontal ruler at the top of the view. Most people pay attention to the vertical ruler the first time it is specifically mentioned, and then forget about it.
In principle, you can move the margins in the vertical ruler, but since you should set the margins anyway in the Layout Page Setup Margins
So it's best to forget the whole thing.
Mac users: The separate window for paragraph formatting
In the following task, we open a separate Paragraph Format Paragraph…
Info: Formatting symbols, what are they?
Formatting symbols (also known as non-printing characters or paragraph marks) are visual indicators that represent the formatting applied to the text in a document. These symbols do not appear when the document is printed but become visible when you enable them. At first, these characters may seem confusing—spaces, for example, appear as dots between words. However, you’ll get used to them quickly!
Nice
Why Formatting Symbols Are Useful:
Troubleshooting : They allow you to see hidden formatting issues, such as extra spaces, unnecessary paragraph breaks, or incorrect use of tabs.Precision in Formatting : They help ensure consistent formatting across your document, especially when dealing with complex layouts or when collaborating with others.Document Layout Control : Understanding where these symbols are used helps in controlling the layout, like preventing unwanted page breaks or maintaining proper alignment.Efficiency : They can speed up the editing process by making it easier to spot and correct formatting errors.
Most common non-printing characters
#### Space
Välilyönti muotoilumerkki
#### Non-breaking space
Sitova välilyönti muotoilumerkki
#### Line break
Rivinvaihto muotoilumerkki
#### Paragraph break
Kappalevaihto muotoilumerkki
#### Page Break
Sivunvaihto muotoilumerkki
#### Section Break
Osanvaihto muotoilumerkki
Line break (Shift + Enter) vs paragraph break (Enter)
A line break does not start a new paragraph. It can be used, for example, to create a multi-line heading with several lines in the same heading. It can also be used in lists to add line breaks under a single bullet point.
Section Break
A section break can be used to divide a document into different sections. We will review section breaks and their usage in more detail in the Horizontal Page and Document Sections chapter.
Osanvaihto valintanauhalla
Osanvaihto valintanauhalla
Section breaks do not have a keyboard shortcut. You can find this option on the ribbon. Select the **Layout ** tab, **Page Setup ** group → **Breaks ** → **Section Breaks **.
Space (Space) vs Non-breaking space (Ctrl + Shift + Space)
Non-breaking space adds a space that keeps words or characters together on the same line, preventing them from being separated by a line break (e.g. a phone number will not break even if the line changes).
Symbolit valintanauhalla
Symboli valikko
You can also insert a non-breaking space from the ribbon: On the **Insert ** tab, in the **Symbols ** group, on the **Symbol ** menu, click the **More Symbols ** button.
Erikoismerkit The non-breaking space can be found on the Special Characters Insert
Page Break (Ctrl + Enter)
A page break is necessary when you want to start a new page in a document without affecting the content or formatting of the previous page.
The page break can also be found on the ribbon.
Sivunvaihto valintanauhalla Click the Page Break Pages Insert
Task: Change the paragraph layout to the hanging indentation
Change the paragraph that starts with "Font size:" to use the hanging indentation. At this stage, the text would look like this:
Nice
### Setting a hanging indentation
Move the cursor to the paragraph that you are editing.
Valintanauhan aloitus-välilehden kappaleryhmän oikeassa alakulmassa on nappi, josta päästään tekemään riippuva sisennys
Click the arrow in the bottom right corner of the **Paragraph ** group on the **Home ** tab.
Select value Hanging Special Indentation
Hanging indentation depth
In the By 4.6 cm . This means that the paragraph is inserted 4.6 cm from the left. You can also use a different depth for the indentation if you wish.
Riippuva-asetus löytyy Kappale-ikkunan Sisennys-ryhmän Mukautettu-alasvetovalikosta Guide
### What is a good hanging indentation depth?
The column spacing according to Finnish document standards is 2.3 cm . If you want a larger space for the page heading, set the value to 4.6 cm , for example, as in the task. Normally, this indentation looks good.
Guide
### Shortcut keys
`Ctrl+T`
Adds or enlarges the hanging indentation, i.e. moves the lower triangle in the ruler to the right by one column.
`Ctrl+Shift+T`
Reduces the indentation, i.e. moves the lower triangle in the ruler to the left by one column.
`Ctrl+Q`
Removes all paragraph styles, including indentations.
In Word, the default column spacing is 2.3 cm, but this can vary between different documents.
The column spacing affects the size of the indentations, when indentations are made with shortcut keys. If you want an indentation depth of 4.6 cm, press the shortcut key combination twice in a row.
Task: Format a margin heading for hanging indentation
For a hanging indentation, format a margin heading by setting the words “Font Size” as a page heading and the rest of the text as the body text.
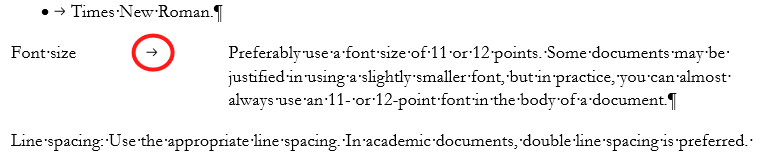
In the model the Tab formatting character is highlighted.
Nice
Page heading formatting
Move the cursor to the end of the desired margin page heading “Font size” and press the Tab key.
Also remove the extra colon at the end of the margin heading and the extra space at the beginning of the body text.
Well done, you've already come a long way in this Word 1 set! Did you remember to save your files? Next, we’ll go through the process of copying and deleting formatting, where we’ll copy your indentation formatting to another part of the document. Before doing so, please confirm below this page as completed.
Have you completed the tasks on the page?