Printing
On this page, we practice print settings. You will learn, among other things, how to print individual charts and to format multi-page printouts for easier reading.
The sheet where the print settings are made is called Print. You can now open it.
The Objective
Next, we will create a printout of the Print sheet. The final printing result is a PDF with two pages, and it will look like this:
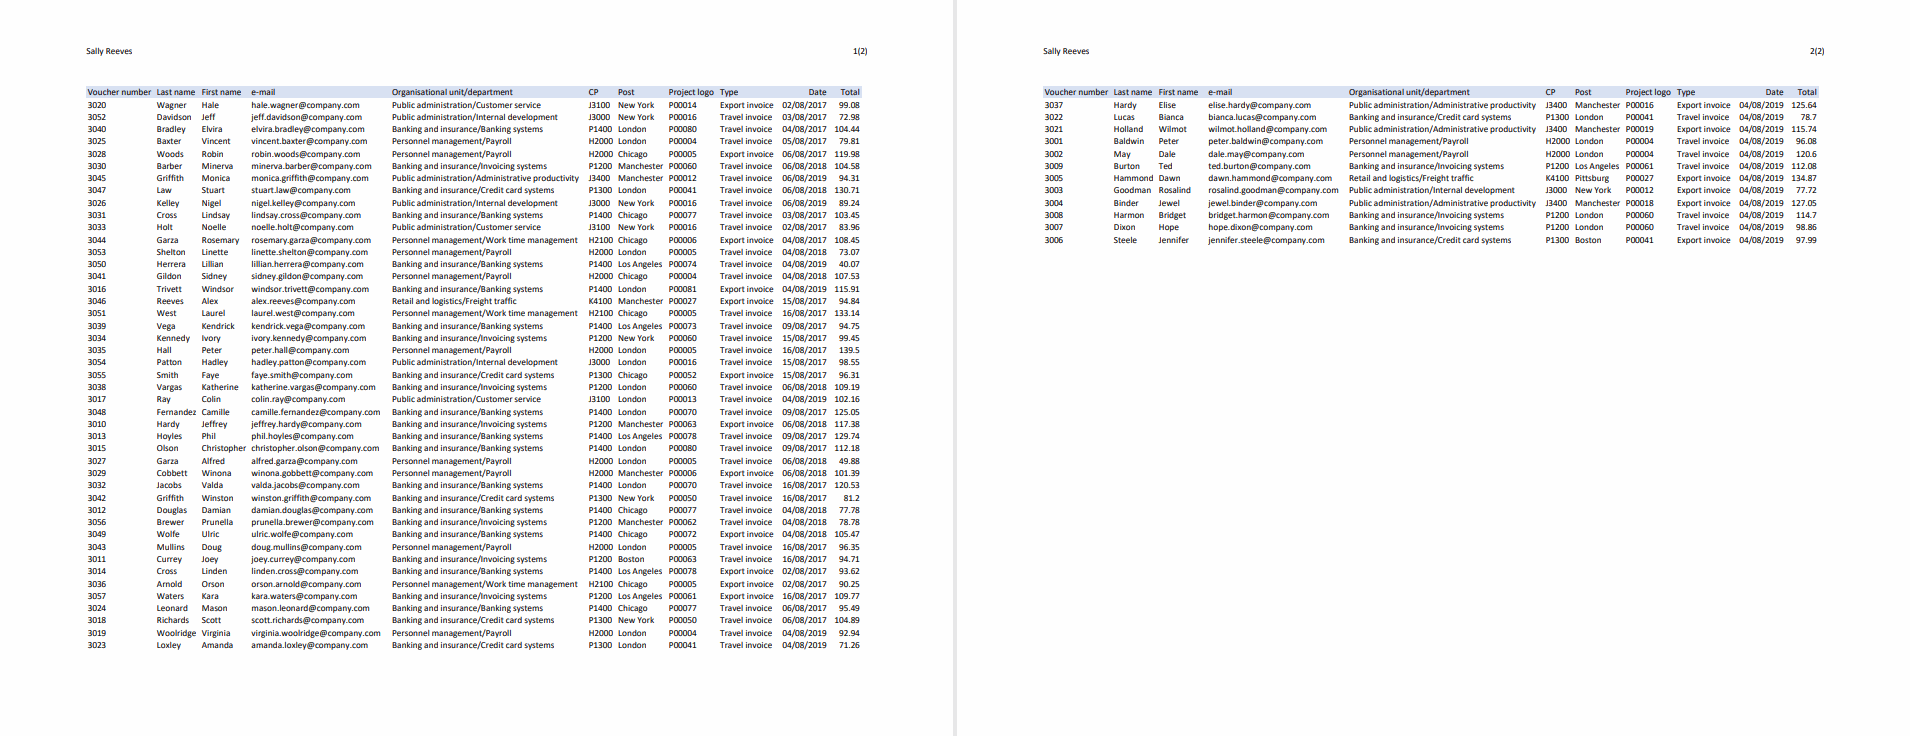 Page numbersThe printout has the page number and the number of pages in header. In this example it says "1 (2)".Title rowTitle row, that is, a row that is repeated on top of peach pageFittingThe printout is fitted on a landscape page.
Data has been fitted in a manner where the with of the table fills the whole page but does not overflow.The authorThe name of the author is placed on left side of the header.
Page numbersThe printout has the page number and the number of pages in header. In this example it says "1 (2)".Title rowTitle row, that is, a row that is repeated on top of peach pageFittingThe printout is fitted on a landscape page.
Data has been fitted in a manner where the with of the table fills the whole page but does not overflow.The authorThe name of the author is placed on left side of the header.Task: Navigate to the page layout view
An Excel sheet does not show how it prints. Let's first get acquainted with how the printing looks and how many pages it will have in the end. The most sensible way to do this is the page layout view, where we can see how the workbook looks when printed. In addition, we will later use the view to edit the header, among other things.
Now open the Print sheet if you haven't opened it yet. Now let's explore it in the Print Layout View.
Task: Print settings: Add wide marginals
Let's start formatting the print by adding wide margins to it. A typical office printer rarely prints to the edges of the page, so without the margins, it’s a risk that the print edges will end up cut out.
Task: Make sure the print size is set to A4
Office paper can be sized differently in different countries. In Finland, the printing paper is practically always A4. Let's make sure that Excel is also using A4 size. It is worth checking: If there is an error, the printing will go wrong.
Task: Set the printing orientation to landscape
Usually, most Excel printouts work best printed with landscape orientation. It gives more space for the horizontal axis of the pictures and, on the other hand, also allows slightly longer lines. In this case, too, the printout at hand looks better and is more readable on horizontal pages.
Change the printout to use landscape orientation.
Task: Set the row 1 to repeat in the beginning of every printed page
Multi-page printouts are much more readable if you add headers to each page. You can specify that some rows or columns are printed at the beginning of each page.
Task: Fit the sheet to the page in the landscape orientation
In practice, we want the sheet to use horizontally as much space as possible. In this case, the printout of the sheet is clean-looking, readable, and effectively utilizes the space offered by the paper. We have an automatic tool for this type of formatting.
Specify that the sheet fits on one page horizontally. The printout should now have two pages.
Task: Add page numbers and the total page count
Finally, we can still stylize the printout by adding document information areas. They are handy for multi-page printouts. Usually, the tabular materiatis printed for reading and browsing. In this case, it is not unusual for the pages to get mixed. Page numbers bring considerable clarity to the printout.
In this case, the total number of pages also increases clarity. The reader always has an idea of the entire length of the printout. At the same time, they also know when processing a page whether it is the last page or not.
Write your own name on the left in the header, the page number and the total number of pages on the right in the header.
Extra task: Add other information to the header and footer
If you want, add information other than the page number and number of pages to the document information areas. Add the file’s name with its paths, the date of printing, and the spreadsheet's name in the header and footer of the file.
Info: A nice thing to do: think of the next person opening the file
When you're done adding or editing a header, Excel is in the View view, where the header is visible. Return to the Normal view so that it will become the default view when the file is opened for the next time. You can do this by clicking an any cell of the table and then the Normal button in the Workbook Views group on the View tab.
Mac: Printing as PDF
In the macOS version, printing as PDF is done differently than in Windows.
Task: Print the sheet as PDF
Print the sheet as a PDF file to the location you want. Examine your output in the preview and make sure that:
- The printout has two landscape pages
- The page number and total number of pages are printing correctly
- The title row (row 1) is also visible on the second page (a row with a faint blue background)
Info: Printing a part of a sheet
It's fairly common to want to print only a part of a sheet. To do this, we can use the Print Area feature.
The feature is handy, but it also sometimes causes confusion, becauseit's difficult to see whether the printing area is set correctly.

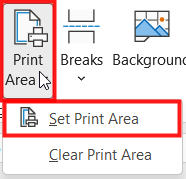 | Paint the area you want to print and navigate to the **Page Layout** tab, then to the **Page Setup** group, and choose **Set Print Area** on the **Print Area** menu. |
Removing the printing area settings
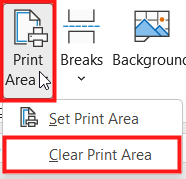 |
You can remove the printing area settings by choosing Clear Print Area. |
Info: Printing a chart only
If you have selected a chart, we will only be printing that.
Problem: The entire sheet sheet will not appear in my printout
If only a part of the spreadsheet is printed, ensure no separate print area has been set. Look at the above section Info: Printing a part of a table sheet and remove the print area setting.
Great, you've completed the last exercises of the Excel 1 course! Hopefully, they've been nice to work through.
Turning in the assignment
Send the assignment to the email address [email protected], and write Excel 1 assignment as the subject. The files to attach to the email:
- Excel_1_Exercise.xlsx, into which you've completed the exercises
- the PDF file of the printed table sheet
Have you turned in the assignment?