Calculations
Excel has two types of formulas: basic calculation formulas and pre-made functions. On this page, we will familiarize ourselves with basic calculation formulas and how to use them.
The calculation always targets cell addresses (or cell references), which consist of the column and row ID. The address of the first cell in the table is A1. Can you say what the cell address at the intersection of the third column and the fifth row of your workbook is?
Formulas always start with an = sign. The = in the beginning activates the formula.
The most commonly used operations
| **+** | Addition |
| **-** | Subtraction |
| **\*** | Multiplication |
| **/** | Division |
The objective
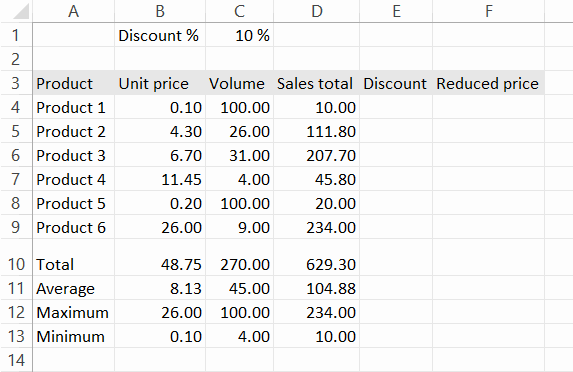
After completing the tasks in this chapter, your workbook should look like this:
Video: Creating a basic formula
Task: Calculate the total amount of sales
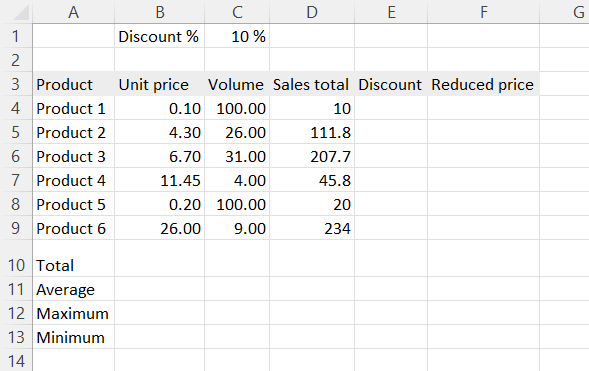
Use a basic calculation formula to find out how much sales have been accumulated in total for products 1–6 in the exercise workbook on the tab Calculation (= unit price*number)
Info: Reviewing the formula
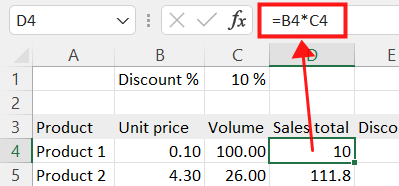
It's essential to review the formulas to make sure they're right.
When you select the cell with the formula, you can see its actual contents on the formula bar.
A handy trick is to double-click the formula cell to see more clearly which cells are referred to in the formula.
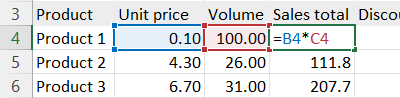
If the formula is correct, you can exit the mode by pressing Esc, so you won't accidentally change the formula.
Info: Copying a formula
You can copy a formula when you need several similar calculations in adjacent cells.
When copying a formula, the references change according to the copying direction.
You can copy the formula like this:
- Select the cell where the desired formula is.
- Use the mouse to grab the lower right corner of the cell so that the mouse pointer changes to a black plus sign.
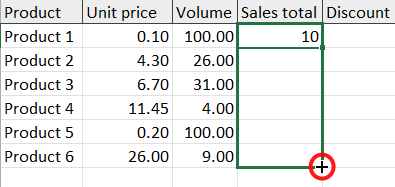
- Copy the pattern by dragging the mouse down or to the left.
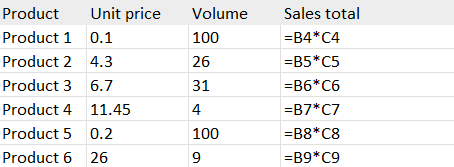
If the formula is copied down, i.e. parallel to the rows, the row numbers of the relative cell references increase.
| #### Before | #### After |
 |
 |
If the formula is copied to the right, i.e. parallel to the columns, the column letters of the relative column references increase.
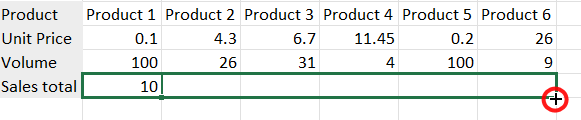

You can test copying on your own exercise workbook!
Info: Basic functions
Functions begin with =, although you don't always have to write it yourself (the character is always written when you write a formula by hand). There are hundreds of different functions, and they all have a name. References in a function, such as specifying which cells are to be added together, always go inside parentheses.
The sum function looks like this: =SUM(reference)
If the reference is a range, the reference has startcell:endcell. For example, A1:A10
The sum function can be added to the sheet in several different ways. Different methods should be used on a case-by-case basis. In the next task, we will practice one of them.
Video: Calculating sums
Task: Create a summation formula under the values on the 'Total' row
Continue on the sheet Calculations.
Create a summation formula in a cell. Use the sum function to find out what the following are for products 1-6:
a) the sum of unit prices b) the sum of the amounts of products
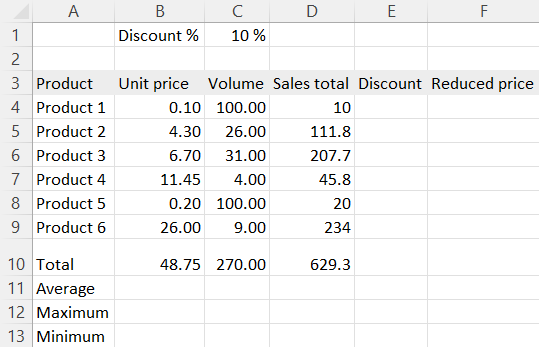
After completing the task, your sheet looks like this:
Info: Multiple sums on one go
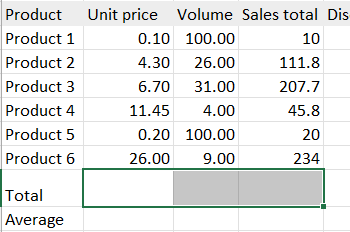
 | You can also calculate the sums of multiple columns at one go. Paint the area where the sums should appear, and then click on **Sum**. |
The formula does not suggest the data be summed but automatically takes the cells above or next to it. You can test this and check from the pre-made formulas that the information is correct.
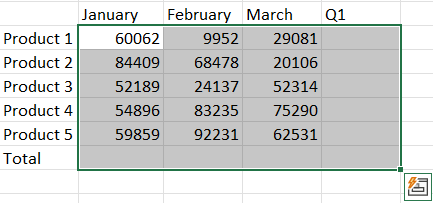
Info: The sums on the rows and the columns on one go
When the data is calculated, and the location of the formula is selected, the function automatically calculates the sum of the selected data. This is a significantly safer method than the previous one because you will choose precisely the right cells and their contents for addition. Give it a try!
Info: Averages, minimums, maximums and amounts
When you click on the symbol on the right of the
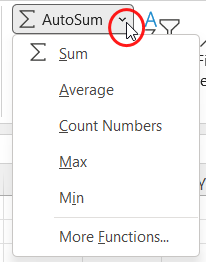 |
Average ( Count Numbers ( Max ( Min ( |
Task: Canclulate the average, and the largest and smallest values
Return to the Calculation sheet in your Excel exercise workbook. Find out the averafe of the unit prices, numbers, and sales totals for products 1-6.
Also, find out their minimum and maximum values.
Great! Now is an excellent time to make sure everything went right. Ensure your workbook is similar to the template at the top of the page.
Are we ready to move on?