Email and Outlook
Outlook is an email client that is part of the Microsoft Office set of software. In addition to the email, the software includes a calendar and a small task manager. We deal on this page with
- the basics of sending an email, i.e. sending a message with different attachments
- various recipient fields, including the often confusing blind carbon copy (Bcc)
- replying to messages
- the basics of message searching
- marking messages as important.
There are desktop, web and mobile versions of the software. In this training we will use the online version of Outlook.
Task: Start Outlook
Task: Create a new email message
Info: Different recipients
An email can have three types of recipients.
The To field is to be filled in with the persons to whom the message is addressed and from whom an action might be expected.
The Cc field is to be filled in with persons to whom the message is for information only. No action is required from the recipients of the copy.
The Bcc field is used when you want to send a message to someone for their information so that others cannot see it. Try how to make the hidden copy field visible.


Task: Add an attachment to the message
- Start a new message and add [email protected] as the recipient.
- Add yourself as a recipient of a copy.
- Add as subject Attachment and screen capture
- Attach a copy of a file to the message using the Attach as copy functionality
- Don't send the message yet, go straight to the next task!
Mac: Screenshot and screen recording
On a Mac computer, screenshots and screen videos are taken with a separate tool.
The tool is started by pressing the Shift+Command+5 key combination.
The screen will then switch to screen shot and screen recording mode.
Screenshot
In screenshot and screen recording mode, there is a button ribbon at the bottom of the screen.

The buttons are from left to right:
- Capture the whole screen
- Capture the selected window
- Capture the selected area
Select the part or area of the screen that you want and capture the image using the Capture button on the right.
Once you've captured the picture, it will appear in the bottom right-hand corner of the screen. You can drag it to the program of your choice. You can also click on it to open it for editing. The edited image is saved in the Desktop folder. If you wait a moment, the capture will disappear from the bottom right corner and can be found on your desktop.
Screen recording
The tool also allows you to make a screen recording. To do this, you need the buttons of the tools:
- Save full screen
- Save the selected area
- The Options button, which opens a menu where you can, among other things, select the audio source, if you want one.
Make the desired settings for the screen recording and start the recording with the Record button on the right.
The recording finishes when you click on the circle with a square inside, appearing in the icon list at the top right of the screen.
Task: Add a screenshot
Often there is a need to “capture” an image of the screen that can be saved, emailed, attached to a document, etc. We'll practice this here by capturing, say, the Word version information in a screen shot and attaching it to a message, but similarly you could also attach it to a file.
- Open the Word version view
- Add a clip from the screen of your choice
- Finally, send a message
Checking the version of Word
Open Word and click on the File button in the top left of the Word window.

In the window that opens, click on the bottom left Account button. The version can be seen on the right in the section Product Information under the heading Subscription Product.

You are probably using the web version of Word. We will deal with this at the end of the first chapter on Word. We recommend that you install and start the desktop version of the application.
Taking a screenshot
Go to the window you want to take a screenshot of and press Win+Shift+S key combination.
If you take a rectangular capture, use the mouse to limit the captured area.

Go to the message, click on the message area and paste the capture into it with theCtrl+V key combination. If the capture is of wrong size, resize it at the corner point.
Send a message
Finally, send the message by clicking on Send button.
Task: Reply to this message
When you receive a message, at the bottom of the preview screen you will find the buttons Reply, Reply all (if the message has been sent to multiple recipients) and Forward, which allow you to reply to the message or forward it.
- Reply to the “Attachment and screen capture” message you sent to yourself
- View the reply you sent in the**Sent Items** folder

Review the reply you sent
Go to Sent Items folder and click on the reply you have sent. By default, the preview only shows your reply, but when you click the three dots at the bottom of the message, the message will open to show the original message.

Do you notice that the content of the message moved to the reply, but not the attachments.
Info: Grouping of messages
Info: Messages with attachment
If there is an attachment in the message, an image of a paper clip will appear next to the message.

To view the attachment you have received, click on it with your mouse.


A separate window will open where you can edit the attachment to the reply, upload it to your computer, or save it to OneDrive.
Use the check mark in the top right corner to close the window.
Task: Mark an important message
You can also specify a time when you want Outlook to remind you.
Flag messages that you sent to yourself
Hover your mouse over the message you want to mark and click on the small flag. The flag of the flagged message will turn red.


Filter flagged messages
You can filter only important flagged messages by clicking the Filter button and selecting Flagged.
![]() |
![]() |
By clicking on Flagged you will get all messages back into view.
Message attachment
Important messages can also be moved to the top of the folder by clicking on the pin.

Task: Search all messages with which you have sent attachments
In everyday life and at work, emails can accumulate, so finding the right messages can be a chore just by scrolling through them. To help here, there is the Search box that allows you to search for messages. Clicking on the barb on the right-hand side of the screen opens a search window where you can enter more complex search criteria.

Let's practise using it: Search all messages in which you are the sender and that contain attachments.
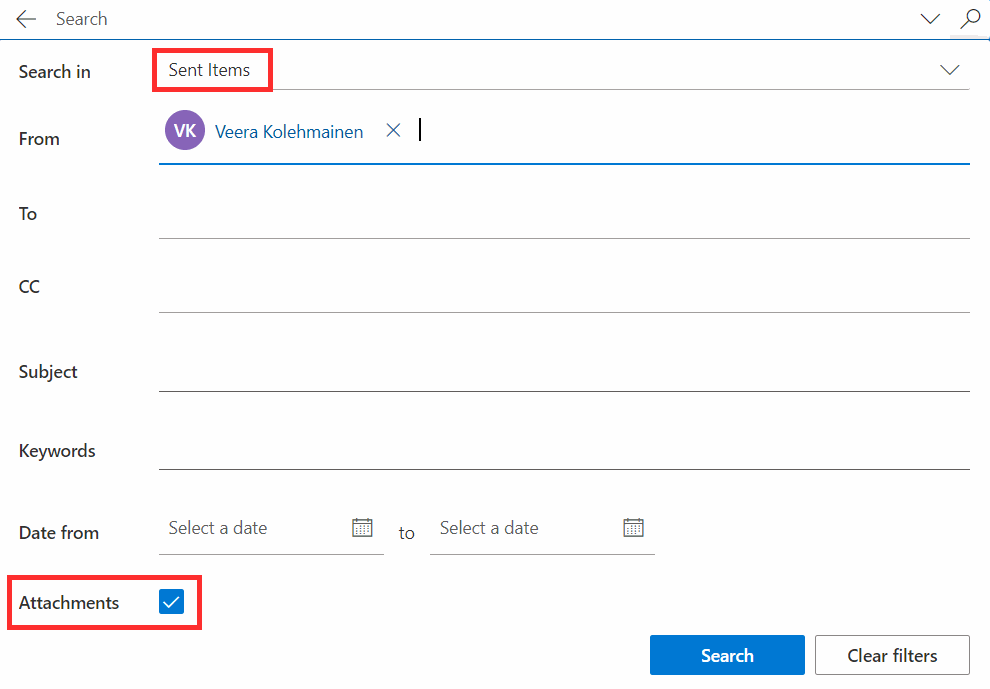
- Select Search in in the folder Sent Items
- Add yourself to the From field
- Click the Attachments box active
- Click on the Search button
Retrieving your own messages
Type “me” in the From field, and Outlook will provide your own email address. Select it.
Searching messages with attachments
Click the Attachments field as checked.
Browsing search results
Click Search.
The search results are displayed in the normal Outlook view.
Exit from search mode
To see all the messages again, click on the left Inbox folder.
This was an optional introductory part of the course, where the most common terms and functions as well as essential tools were reviewed. Now you can mark this chapter as completed and get down to business.
Shall we mark it as completed and move on?
You have now gone through the Basics chapter in its entirety.
Continue to Basics of Spreadsheets: Welcome.


